So, I think I will delete this blog. It has been fun, and although I have quite the cue of pics and recipes, I am just too insanely busy to keep up with it. All it does is sit there and remind me of one more thing I need to do that I haven't done. (anyone else have the half completed projects in their closet?)
Anyway, to get rid of some of the guilt I have been feeling, I took down all the recipes I had inside my cupboards and...threw them away! I felt so free!
I will leave this up until I figure a super easy way to transfer the info here to one of my other blogs (being super computer-y is not on my extensive list of talents...) And when I come across something that needs to be shared, I will post there. :)
I feel better already.
Monday, December 8, 2008
Tuesday, November 4, 2008
Cinnamon Kix
These little treats are so fun to munch. This recipe can be doubled and made with one bag corn puffs. They are so addictive that way, but don't read the nutritional info of those corn puffs. I wanted a better alternative for when we are craving them, and subbed Kix cereal and added cinnamon oil. Try other flavoring oils or extracts for a different treat.

Cinnamon Kix
1 box Kix cereal
½ c. sugar
½ c corn syrup
¼ c. butter
¼ tsp cinnamon oil—add 1/8 tsp more for a stronger cinnamon flavor
½ tsp baking soda
red food coloring (optional)
Bring sugar, corn syrup and butter to a boil. Add baking soda, cinnamon oil and red food coloring and stir to combine. Pour Kix in a large bowl coated with pam. Pour cinnamon mix over cereal and stir to coat. Transfer to greased cookie sheet. Bake at 250 stirring every 10 min for 45 min. spread on wax paper to cool.
Friday, October 3, 2008
What did You have for lunch today?
I had a bagleful and some fresca today. Not exciting, but a week or so ago I treated myself to this: An amazing capreese salad with tomatoes and basil from the garden, fresh mozzarella, good, fruity olive oil and a sweet, smooth balsamic reduction.
 An amazing capreese salad with tomatoes and basil from the garden, fresh mozzarella, good, fruity olive oil and a sweet, smooth balsamic reduction.
 So so so tasty. My 4 year old and I were in heaven!
We had a fabulous dinned a few weeks ago with some of my husband's co-workers, and had a capreese salad with balsamic reduction. I had to re-create!
Assembly is easy, just put sliced, vine ripened tomatoes, thinly sliced fresh mozzarella and a pile of fresh basil leaves that you have chopped on a plate in a pretty design. Drizzle with the best olive oil you have. Drizzle with Balsamic reduction. (recipe below) and eat!
Balsamic reduction
This one took me a few tries to get it the way I like. Makes a lot... refrigerate it and use frequently.
3/4 c good balsamic vinegar. ( I like the Kirkland brand you can get at Costco)
1 1/2 Tbs brown sugar (that is 1 tbs + 1 1/2 tsp for those of you who don't like kitchen math)
1 clove garlic, smooshed with side of knife and peel removed
Combine all in a saucepan and simmer for 10 min, until thick as cold syrup. remove garlic clove, and use. store in fridge.
***Moments of brilliance I cannot take credit for***
My Husband mixes some of this reduction in a small amount of mayo and makes amazing sandwiches that taste so gourmet! We really like it on grilled tomato and mozzarella sandwiches!
Monday, September 22, 2008
Chili for a chilly day
Happy first day of fall! It is raining at my house today. All the wind and cold has me thinking about soup. I love soup. We tried this one a few weeks ago, and I was surprised at how good it was. I normally am not a big fan of red chili, and pepperoni is generally forbidden at our house. But I found Hormel turkey pepperoni and it is tasty and not greasy (thanks for telling me about it, Michelle). It has waaaay fewer calories and tons less fat than normal pepperoni. Still not health food, but okay for every once in a while. This soup is so good my kids gobbled it up, and my 7 year old asked for the leftovers the next night instead of what I had prepared for dinner. Really easy and really tasty. Perfect for this chilly, rainy day. Enjoy! Pepperoni pizza chili
1 pound ground beef Pepperoni pizza chili
1 can (16 ounces) kidney beans, rinsed and drained
1 can (15 ounces) pizza sauce
1 can (14-1/2 ounces) Italian stewed tomatoes
1 can (8 ounces) tomato sauce
1-1/2 cups water
1 package (3-1/2 ounces) sliced pepperoni
1/2 cup chopped green pepper
1 teaspoon pizza seasoning or Italian seasoning
1 teaspoon salt
Shredded part-skim mozzarella cheese, optional
In a large saucepan, cook beef over medium heat until no longer pink; drain. Stir in the beans, pizza sauce, tomatoes, tomato sauce, water, pepperoni, green pepper, pizza seasoning and salt. Bring to a boil. Reduce heat; simmer, uncovered, for 30 minutes or until chili reaches desired thickness. Sprinkle with cheese if desired.
Friday, September 19, 2008
Green Chile Chicken Tamales
These are tasty tamales. A little bit of work, but oh, so worth it. Delicious! And it makes a ton. I froze half of the tamales, and we take them out and steam them or nuke them in the microwave, wrapped in a wet paper towel for 2 min, or until hot.
Don't be afraid of the Serrano chilies, I took out the seeds of two because I thought they would be too spicy, but the sauce turned out really mild, so next time I will leave in all the chili seeds. Also, I needed two batches of masa to use up all the chicken filling. One batch I used lard, 'cause I'm sure that is what the little Mexican lady that sells them at the farmers market uses. The second batch I used half shortening and half unsalted butter, and cut down the amount of fat by about 3 tablespoons. We really liked the shortening/butter version better. they were much less greasy and had a better flavor. I also just cooked a few chicken breasts in the crock pot with about 1/2 cup salsa instead of using rotisserie chicken. Enjoy!

Green Chile Chicken Tamales
Filling 1 8-ounce package dried corn husks
1 pound tomatillos, husked, rinsed 4 3-inch-long Serrano chiles, stemmed, chopped 4 large garlic cloves, chopped 1 1/2 tablespoons olive oil 2 cups low-salt chicken broth 4 cups (packed) coarsely shredded cooked chicken (about 1 pound; from purchased rotisserie chicken) 2/3 cup chopped fresh cilantro
Dough 1 1/3 cups lard or solid vegetable shortening 1 1/2 teaspoons salt (omit if masa mixture contains salt) 1 1/2 teaspoons baking powder (omit if masa mixture contains baking powder) 4 cups freshly ground masa dough for tamales (34 to 36 ounces), or make masa dough with 31/2cups masa harina (corn tortilla mix; about 17 ounces) mixed with 2 1/4 cups warm water 2 cups (about) low-salt chicken broth
Preparation For filling: Place husks in large pot or large bowl; add water to cover. Place heavy plate on husks to keep submerged. Let stand until husks soften, turning occasionally, at least 3 hours and up to 1 day.
Preheat broiler. Line heavy baking sheet with foil. Arrange tomatillos on prepared sheet. Broil until tomatillos blacken in spots, turning once, about 5 minutes per side. Transfer tomatillos and any juices on sheet to processor and cool. Add chiles and garlic to processor and blend until smooth puree forms. Heat oil in medium saucepan over medium-high heat. Add tomatillo puree and boil 5 minutes, stirring often. Add broth. Reduce heat to medium; simmer until sauce coats spoon thickly and is reduced to 1 cup, stirring occasionally, about 40 minutes. Season with salt. Mix in chicken and cilantro. (Can be made 1 day ahead. Cover and chill.)
For dough: Using electric mixer, beat lard (with salt and baking powder, if using) in large bowl until fluffy. Beat in fresh masa or masa harina mixture in 4 additions. Reduce speed to low and gradually beat in 1 1/2 cups broth, forming tender dough. If dough seems firm, beat in enough broth, 2 tablespoons at a time, to soften.
Fill bottom of pot with steamer insert with enough water (about 2 inches) to reach bottom of insert. Line bottom of insert with some softened corn husks. Tear 3 large husks into 1/4-inch-wide strips to use as ties and set aside. Open 2 large husks on work surface. Spread 1/4 cup dough in 4-inch square in center of each, leaving 2- to 3-inch plain border at narrow end of husk. Spoon heaping tablespoon filling in strip down center of each dough square. Fold long sides of husk and dough over filling to cover. Fold up narrow end of husk. Tie folded portion with strip of husk to secure, leaving wide end of tamale open. Stand tamales in steamer basket. Repeat with more husks, dough, and filling until all filling has been used. If necessary to keep tamales upright in steamer, insert pieces of crumpled foil between them.

Bring water in pot to boil. Cover pot and steam tamales until dough is firm to touch and separates easily from husk, adding more water to pot as necessary, about 45 minutes. Let stand 10 minutes. (Can be made 2 days ahead. Cool 1 hour. Cover and chill. Before serving, re-steam tamales until hot, about 35 minutes.)

Monday, September 15, 2008
You should have been home Monday night...
I tried a new treat for family night treat this week. It was so yummy that we decided we had to give it away...and fast. Or we might eat more of it. Or all of it. We decided to take the yummy goodness to some neighbors we usually don't take treats to on a regular basis. We caught a few people home, but so many were not. So, we decided to try just any of our neighbors. It took some time to find people home to accept our homemade delight. I have to say, they were so lucky! So, If you are my neighbor and weren't home Monday night, here is what you missed...Maybe you will stay home next week. But, it is my husband's turn for treat.....so maybe not. Mascarpone Cheesecake (Mwahahhahahahhaaa)
 Mascarpone Cheesecake (Mwahahhahahahhaaa)
Yes, this deserves the "evil laugh".
I have only ever tried a cheesecake once, and it came out all cracked on top and kinda lumpy on the inside. Not being a big fan of cheesecake, I never tried again. Until today. This cheesecake is sooo creamy! It was very easy to make, too. I followed the directions exactly, except for I made it in a 10" springform and it was perfectly done at 50 minutes. I used Tom's gourmet caramel ice cream topping (available at my local associated food stores) and it was tasty stuff. I hope you enjoy!
Mascarpone Cheesecake
Ingredients:
3/4 cup graham cracker crumbs
3 tablespoons sugar
3 tablespoons butter, melted
FILLING:
2 packages (8 ounces each) cream cheese, softened
2 cartons (8 ounces each) Mascarpone cheese
1 cup sugar
1 tablespoon lemon juice
1 tablespoon vanilla extract
4 eggs, lightly beaten
TOPPING:
1 envelope whipped topping mix
1 tablespoon caramel ice cream topping
Directions: Place a greased 9-in. springform pan on a double thickness of heavy-duty foil (about 18 in. square). Securely wrap foil around pan. In a small bowl, combine cracker crumbs and sugar; stir in butter. Press onto the bottom of prepared pan. Place pan on a baking sheet. Bake at 325° for 10 minutes. Cool on a wire rack. For filling, in a large mixing bowl, beat the cheeses, sugar, lemon juice and vanilla until smooth. Add eggs; beat on low speed just until combined. Pour over crust. Place springform pan in a large baking pan; add 1 in. of hot water to larger pan. Bake at 325° for 50-60 minutes or until center is just set and top appears dull. Remove springform pan from water bath. Cool on a wire rack for 10 minutes. Carefully run a knife around the edge of pan to loosen; cool 1 hour longer. Refrigerate overnight. Remove sides of pan. Before serving, prepare topping mix according to package directions. Garnish cheesecake with whipped topping; drizzle with caramel. Refrigerate leftovers.
Friday, September 12, 2008
Cinnamon Pecan braid
This sweet bread is so delicious! I am an average bread maker...and this was easy and turned out perfect. (I have to acknowledge my amazing hubby who took care of the final rise and baking while I was in a meeting...he did an awesome job!) When we open our bed and breakfast (hey, ya gotta have dreams) I will be making this for our guests. This recipe makes a ton. Two big loaves. We divided one and took them to neighbors, and ate the other one. I took the leftovers 2 days later and made the MOST AMAZING french toast ever. Maybe I will make this again just to have the french toast. Yummy.
 Cinnamon Pecan Braid
6 to 6-1/2 cups all-purpose flour
2 packages (1/4 ounce each) active dry yeast
1-1/2 teaspoons salt
1/2 teaspoon sugar
1-1/2 cups water
1/2 cup plus 2 tablespoons butter, softened, divided
2 eggs
1 cup chopped pecans
1/2 cup packed brown sugar
1 teaspoon ground cinnamon
 When we open our bed and breakfast (hey, ya gotta have dreams) I will be making this for our guests. This recipe makes a ton. Two big loaves. We divided one and took them to neighbors, and ate the other one. I took the leftovers 2 days later and made the MOST AMAZING french toast ever. Maybe I will make this again just to have the french toast. Yummy.
 Cinnamon Pecan Braid
6 to 6-1/2 cups all-purpose flour
2 packages (1/4 ounce each) active dry yeast
1-1/2 teaspoons salt
1/2 teaspoon sugar
1-1/2 cups water
1/2 cup plus 2 tablespoons butter, softened, divided
2 eggs
1 cup chopped pecans
1/2 cup packed brown sugar
1 teaspoon ground cinnamon
1/2 teaspoon cardamom (optional)
GLAZE:
2 cups confectioners' sugar
1/2 teaspoon cinnamon
2 to 3 tablespoons water
Directions: In a large mixing bowl, combine 3 cups flour, yeast, salt and sugar. In a small saucepan, heat water and 1/2 cup butter to 120°-130°. Add to dry ingredients; beat just until moistened. Add eggs; beat until smooth. Stir in enough remaining flour to form a soft dough (dough will be sticky). Turn onto a floured surface; knead until smooth and elastic, about 6-8 minutes. Place in a greased bowl, turning once to grease top. Cover and let rise in a warm place until doubled, about 1 hour. Punch dough down. Divide into six portions. Roll out each portion into a 12-in. x 6-in. rectangle. Melt remaining butter; brush over dough. Combine pecans, brown sugar cinnamon and cardamom; sprinkle over dough to within 1/2 in. of edges. Roll up jelly-roll style, starting with a long side; pinch seams to seal. Place three ropes seam side down on a greased baking sheet and braid; pinch ends to seal and tuck under. Repeat with remaining ropes. Cover and let rise until doubled, about 45 minutes. Bake at 325° for 25-30 minutes or until golden brown. Cool for 10 minutes before removing from pans to wire racks. Combine glaze ingredients; drizzle over loaves. Serve warm. Yield: 2 loaves.

Saturday, September 6, 2008
You gotta try this!!
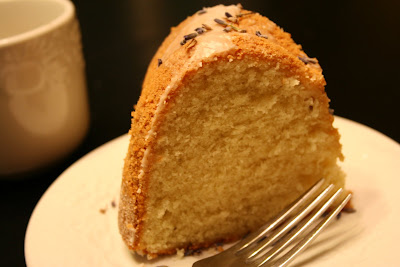
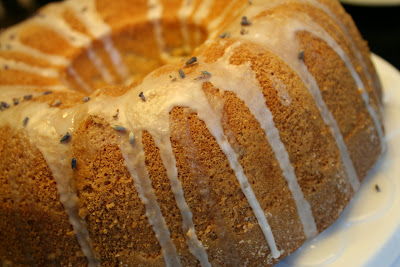 I had book group at my house last month. We read Pride and Prejudice by Jane Austen( One of my all time favorite books!). What to serve as a treat with that book? A lovely Almond Lavender pound cake, made with English lavender, of course! Don't be afraid to try this delicious treat because it has lavender in it. It is a subtle addition, but it makes this moist cake something to remember! If you're really apprehensive, don't sprinkle any on as garnish, the straight blossoms are pretty potent, but it's fun to get a shot of that strong flavor every once and again. You gotta try this "show off" dessert!
 Even my 4 year old loved this cake...in all it's stages.
Lavender Pound Cake
2 cups sugar, divided
1/2 cup slivered almonds
1 tablespoon plus 2 teaspoons dried lavender flowers, divided
1 cup butter, softened
4 eggs
2 teaspoons vanilla extract
1 cup (8 ounces) sour cream
1/4 cup half-and-half cream
2-1/2 cups all-purpose flour
1/2 teaspoon baking soda
1/2 teaspoon salt
8teaspoons boiling water
1 1/2 cups confectioners' sugar
Additional dried lavender flowers
Grease a 10-in. fluted tube pan and sprinkle with sugar; set aside. Place 1/2 cup sugar, the almonds and 1 tablespoon lavender in a food processor; cover and process until finely ground. In a large mixing bowl, cream butter and remaining sugar until light and fluffy; beat in almond mixture until combined. Add eggs, one at a time, beating well after each addition. Beat in vanilla. In a small bowl, combine sour cream and half-and-half. Combine the flour, baking soda and salt; add to the creamed mixture alternately with sour cream mixture, beating well after each addition. Pour into prepared pan. Bake at 350° for 55-60 minutes or until a toothpick inserted near the center comes out clean. Cool for 10 minutes before removing from pan to a wire rack to cool completely. For drizzle, in a small bowl, combine water and remaining lavender. Cover and steep for 5 minutes. Strain, discarding lavender. In another small bowl, combine confectioners' sugar and enough infused water to achieve desired consistency; drizzle over cake. Garnish with additional lavender.
I found dried lavender flowers at my local natural foods store. Some places sell it in bulk. Don't be afraid of the price tag. At my store, it was almost 30 dollars a pound, but I got almost two cups for 5 dollars. You only need a tiny bit for this cake, probably a dollar's worth or under.
Also, the cake kind of stuck to the pan. You can avoid this by just greasing and flouring it, but you won't get the sweet outer crust. It will still be delicious!
Tuesday, September 2, 2008
Tomato week: part two
Sorry I have been MIA lately. It was cake week(s). I'll post pictures of those HERE soon. But, I have a whole bunch of recipes I have been trying to post here, So I will update this blog more frequently. (I hope)
Here is another recipe from our tomato week. (which actually never ended and has turned into tomato month...) It is delicious. You've gotta try it. We will be eating it again before our tomatoes are gone.
(found it in Taste of Home magazine)
 Ingredients:
3/4 cup all-purpose flour
1/2 cup cornmeal
1/2 teaspoon salt
1/8 teaspoon pepper
1/3 cup shortening
4 to 5 tablespoons cold water
FILLING:
2 cups chopped plum tomatoes
1 teaspoon salt
1/2 teaspoon dried basil
1/8 teaspoon pepper
1/2 cup chopped green onions
1/2 cup shredded cheddar cheese
1/2 cup shredded Swiss cheese
2 tablespoons all-purpose flour
2 eggs
1 cup evaporated milk
Directions: In a small bowl, combine the first four ingredients. Cut in shortening until crumbly. Add water, tossing with a fork until dough forms a ball. Refrigerate for 30 minutes. On a lightly floured surface, roll out dough to fit a 9-in. pie plate; transfer pastry to plate. Trim to 1/2 in. beyond edge of plate; flute edges. Bake at 375° for 10 minutes. Cool completely. Place tomatoes in the crust; sprinkle with salt, basil, pepper, onions and cheeses. In a small bowl, whisk the flour, eggs and milk until smooth. Pour over filling. Bake at 375° for 40-45 minutes or until a knife inserted near the center comes out clean. Let stand for 10 minutes before cutting. Refrigerate leftovers.
 Do NOT skip out on this crust. It is awesome with the quiche. And it is easy to make and work with.
 Next time, we are going to add jalapenos and bell peppers from our garden ...maybe some cilantro as well. Yum!
Tuesday, August 26, 2008
Tomato week: Part one
Holy tomatoes, Batman!
I have literally been pulling pounds of tomatoes out of my garden several times a week. They are taking over! So, I have been trying every tomato recipe I can find. Every meal I have made for the last 8 days has featured tomatoes. Breakfast, lunch and dinner. About 2 days into this and my 7 year old said, "Let me guess,mom, this week is tomato week and everything we eat has to have tomatoes in it."
I gave her peanut butter and jelly in her lunch box today.
Here is a new recipe we tried early on in "Tomato week" before baking
 before baking
Tomato Onion Phyllo Pizza
5 tablespoons butter, melted
14 sheets phyllo dough (14 inches x 9 inches)
7 tablespoons grated Parmesan cheese, divided
1 cup (4 ounces) shredded part-skim mozzarella cheese
1 cup thinly sliced onion
1 pound plum tomatoes, sliced
1-1/2 teaspoons minced fresh oregano or 1/2 teaspoon dried oregano
1 teaspoon minced fresh thyme or 1/4 teaspoon dried thyme
Salt and pepper to taste
DIRECTIONS
Brush a 15-in. x 10-in. x 1-in. baking pan with some of the melted butter. Unroll phyllo dough; cut stack into a 10-1/2-in. x 9-in. rectangle. Discard scraps. Line bottom of prepared pan with two sheets of phyllo dough (sheets will overlap slightly). Brush with butter and sprinkle with 1 tablespoon Parmesan cheese. Repeat layers 5 times. (Keep dough covered with plastic wrap and a damp towel until ready to use to prevent it from drying out.) Top with layers of remaining phyllo dough; brush with remaining butter. Sprinkle with mozzarella cheese; arrange onion and tomatoes over cheese. Sprinkle with oregano, thyme, salt, pepper and remaining Parmesan cheese. Bake at 375° for 20-25 minutes or until edges are golden brown. Yield: 28 slices.

We liked this pizza, but were not crazy about the crust. That might be because I found some phyllo dough in the back of my freezer and used that (I can't remember the last time I purchased phyllo...)and so it tasted a little...dusty.
I used walla walla sweet onions, because they are SOOO good. I also used basil instead of oregano because that is what I had growing in the garden. Although I love the way my pizza looked and it was nice to be able to cut slices without onion for the kids, I should have mixed the onions and tomatoes together more. The best flavor was tomato and sweet onion in the same bite. We will be making this again, but I will try using puff pastry for a crust and call it a tart. Or maybe I will just use phyllo that is not years(?) old.
Thursday, August 21, 2008
ATK does it again!
I got the recipe for these fabulous cookies in my in box. They are from America's test kitchen. Gorgeous chocolate chunk cookies. I used more than the two cups chocolate chips the recipe called for, and I would only put two in my next batch. We liked these best warm from the oven or at least the day they were baked, so freeze the dough and make only what will be consumed the day you make them. The neighbor I took these to told me they were "out of control". Try them and see for yourself.

These truly chewy chocolate chip cookies are delicious served warm from the oven or cooled. To ensure a chewy texture, leave the cookies on the cookie sheet to cool. You can substitute white, milk chocolate, or peanut butter chips for the semi- or bittersweet chips called for in the recipe. In addition to chips, you can flavor the dough with one cup of nuts, raisins, or shredded coconut.
INGREDIENTS
2 1/8 cups bleached all-purpose flour (about 10 1/2 ounces)
1/2 teaspoon table salt
1/2 teaspoon baking soda
12 tablespoons unsalted butter (1 1/2 sticks), melted and cooled slightly
1 cup brown sugar (light or dark), 7 ounces
1/2 cup granulated sugar (3 1/2 ounces)
1 large egg
1 large egg yolk
2 teaspoons vanilla extract
1 - 2 cups chocolate chips or chunks (semi or bittersweet)
1. Heat oven to 325 degrees. Adjust oven racks to upper- and lower-middle positions. Mix flour, salt, and baking soda together in medium bowl; set aside.
2. Either by hand or with electric mixer, mix butter and sugars until thoroughly blended. Mix in egg, yolk, and vanilla. Add dry ingredients; mix until just combined. Stir in chips.
3. Following illustrations below, form scant 1/4 cup dough into ball. Holding dough ball using fingertips of both hands, pull into two equal halves. Rotate halves ninety degrees and, with jagged surfaces exposed, join halves together at their base, again forming a single cookie, being careful not to smooth dough’s uneven surface. Place formed dough onto one of two parchment paper-lined 20-by-14-inch lipless cookie sheets, about nine dough balls per sheet. Smaller cookie sheets can be used, but fewer cookies can be baked at one time and baking time may need to be adjusted. (Dough can be refrigerated up to 2 days or frozen up to 1 month—shaped or not.)
4. Bake, reversing cookie sheets’ positions halfway through baking, until cookies are light golden brown and outer edges start to harden yet centers are still soft and puffy, 15 to 18 minutes (start checking at 13 minutes). (Frozen dough requires an extra 1 to 2 minutes baking time.) Cool cookies on cookie sheets. Serve or store in airtight container.
You can find the recipe online here with illustrations.
Tuesday, August 19, 2008
Good, not great.
I had a recipe for whole wheat peanut butter cookies on the inside of my cupboard, and the fist day of school was the perfect time to try them.
I cut the recipe from a newspaper, but I found the same recipe here.
Whole wheat peanut butter cookies
1 cup peanut butter
1/2 cup butter, softened
1/2 cup honey
1/2 cup packed brown sugar
1 egg
1 1/4 cups whole wheat flour
1 teaspoon baking powder
Preheat the oven to 350 degrees F (175 degrees C).
In a large bowl, mix together the peanut butter, butter, honey, brown sugar and egg until smooth. Combine the whole wheat flour and baking powder; stir into the batter until blended. Roll into small balls, and place on a greased cookie sheet. Flatten slightly using a fork.
Bake for 13 to 15 minutes in the preheated oven, or until cookies are slightly toasted at the edges.
My kids liked these and didn't realize they were "healthier". My husband thought they were okay, but only ate one and walked away. I thought they were too salty, even though there was no salt in the recipe, and the peanut butter I used didn't taste salty. I had to add a bit extra flour, maybe a quarter cup, because the dough was so soft. Even then it was a very soft dough, no way you could roll it into balls.
I left out my cookies on the counter uncovered (on accident) overnight and today they are still chewy and not dry at all. The saltiness has even mellowed. I think they are definitely better today.
The kids like 'em, so I think I'll keep the recipe, but won't be taking these anywhere I need to wow people.
Saturday, August 9, 2008
My mission and my motivation
This is what my cupboards look like on the outside.

This is what my cupboards look like on the inside.
 And this is the "neat and orderly" one.
 And this is the "neat and orderly" one.
I am constantly finding recipes that sound good. In the newspaper, on packaging, in magazines, on the Internet, everywhere! I had this brilliant idea on day to avoid all the piles of recipes. I would cut them out and tape them on the inside of my cupboards. I would then be reminded to try the recipe. When I tried it, I would either put it in my recipe book (if it was a keeper) or throw it away (if it was not).
You can see for yourself how well that's working.
So here is my Mission: to clear my cupboard doors.
My motivation: You're looking at it. I plan to try these recipes out and post here all about it. So you can find out if that chocolate tofu tart from the health spa in CA is really any good, or if some random grandma's for recipe pecan crusted chicken deserved to be in the paper. That recipe you saw on the TV? I'll try it. Maybe I'll even make the cookies that my husband's co-worker sent the recipe home for me to make. I'll even try some of the ideas floating around in my brain (which I imagine looks even more cluttered than my cupboard doors...). I tell you what I thought, what my family and neighbors thought (consider this your warning) and what did and did not work. Wish me luck!
Subscribe to:
Posts (Atom)
